Deep-superficial tutorial
This tutorial will guide you through the deep-superficial assignment for CA1 recordings. If a ripple channeltag is provided (session.channelTags.Ripple.channels), ripples will be detected using the provided channel (ce_FindRipples.m), and the reversal point and classification will be determined in the pipeline for each electrode group based on the average ripple. You can visualize the assignment and perform manual curation in a graphical interface afterwards if needed.
Make sure to define bad channel (e.g. floating channels) and bad electrodes (e.g. broken shanks) before running the processing module (session.channelTags.Bad.channels and session.channelTags.Bad.electrodeGroups) as they have a negative effect on the determination of the reversal point of the sharp-wave.
Deep-superficial algorithm
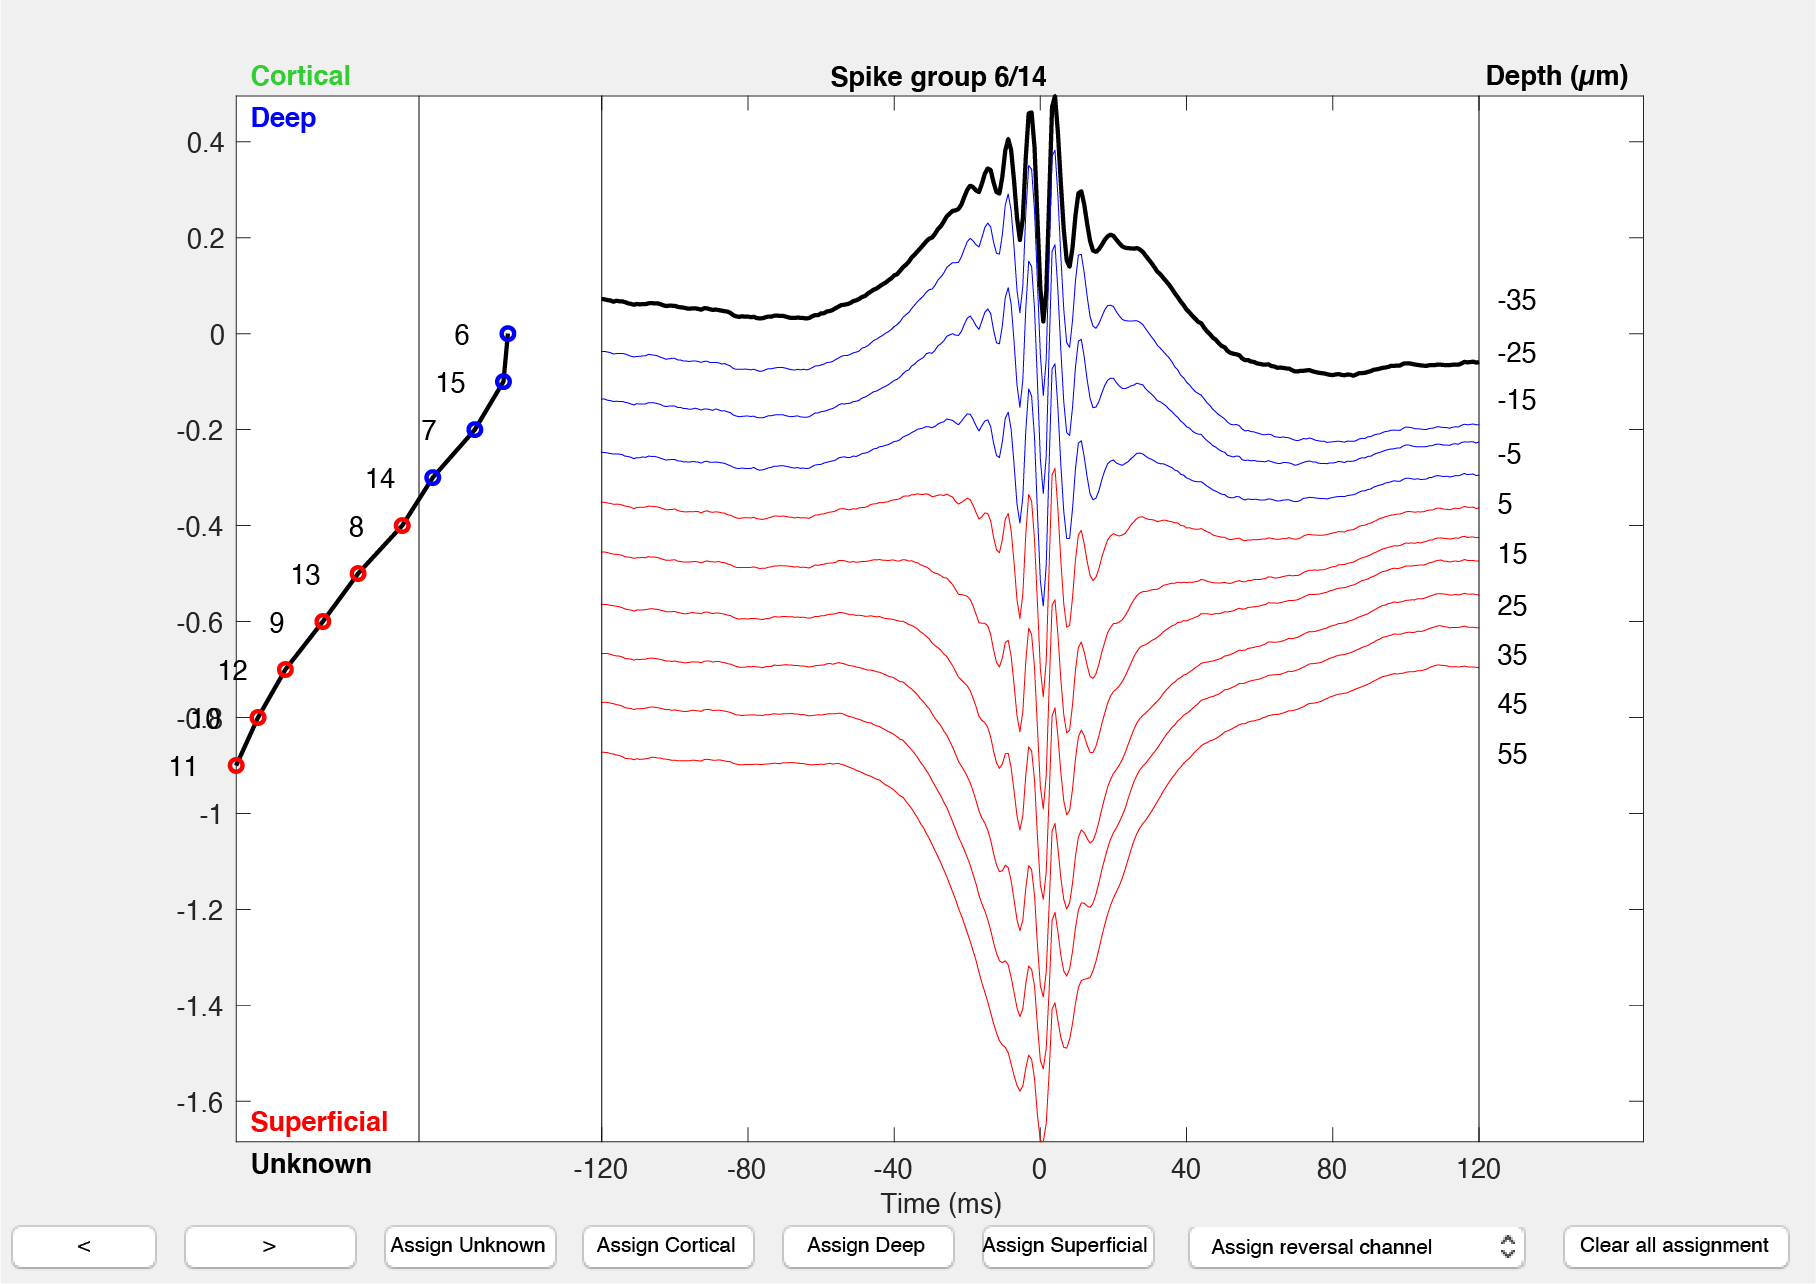
The deep-superficial algorithm is built upon the reversal of the sharp-wave that happens together with the faster ripple oscillation (150Hz; see the figure below). In CA1, a sharp-wave occur together with the fast ripple oscillation and reverses across the pyramidal layer. The sharp-wave has a wider spatial span for depth-classification than the high frequency ripple, and works well for bilateral recordings. The polarity of the sharp-wave is determined from an interval before the average ripple peak at -40.8ms to -12.8ms, as this has shown to be rebust across species (rats and mice). The algorith will look for the point where the polarity of the sharp-wave flips. There is no sharp-wave on channels sitting in the cortex, and the polarity is zero. As you go down, channels will have an increasing positive sharp-wave polarity. The polarity of the sharp-wave peaks above or within the pyramidal layer, and reverses in the pyramidal layer. The algorith will only assign two labels: deep and superficial. Cortical channnels must be defined beforehand (session.channelTags.Cortical.electrodeGroups) or can be done in the GUI described below.
Implementation
The script below will create a file in the basepath with the classification: ‘sessionName.deepSuperficialfromRipple.channelinfo.mat’:
classification_DeepSuperficial(session);
Please see the description of input and related files here.
Using the graphical interface for curating deep-superficial assignments
- Launch the deep-superficial GUI providing the path to your data
path_to_dataand thebasename(optional):gui_DeepSuperficial(path_to_data,basename) - The interface shows you one electrode group at the time, and the average ripple response across the channels, aligned to the peak of the ripple. The channels are projected vertically according to their order within the electrode group (assumed to be sorted by vertical position on the shank). Ripples in CA1 consist of an approximately 150Hz oscillation and typically lasts for about 60-150ms (the fast oscillation observed across all the channels in the above screenshot). The traces are color-coded by their assignment (deep:blue, superficial: red; cortical:green, unknown: dark grey). The channel used for the ripple detection is highlighted in black.
- The left side of the graphical interface shows the polarity of the sharp-wave channel-wise as captured by the algorithm described in the previous section.
- Using the buttons at to bottom of the figure, you can assign depth classification (Unknown, Cortical, Deep or Superficial) to the whole electrode group, or a reversal channel. The value in
session.analysisTags.probesVerticalSpacingis used as the vertical distance along the electrode. - You can inspect the classification by going through each electrodes.
Launch the Deep-Superficial GUI directly from CellExplorer
- Launch CellExplorer
cell_metrics = CellExplorer('metrics',cell_metrics); - From the top menu select
Classification->Adjust Deep-Superficial assignment for session. The deep-superficial data will now be loaded and the deep-superficial interface will be displayed. - Adjust channel assignment using the mouse or the numeric keypad.
- Once done, simply close the figure.
- You will be prompted to save the manual curation. If you confirm, it will save the
'sessionName.deepSuperficialfromRipple.channelinfo.mat'to the data folder and update the units in thecell_metricsfile as well.